Distributed Polling
Enterprise Feature
This is a feature which is currently only included in the Enterprise Edition of Observium. Support for this feature can be obtained on our Discord server.
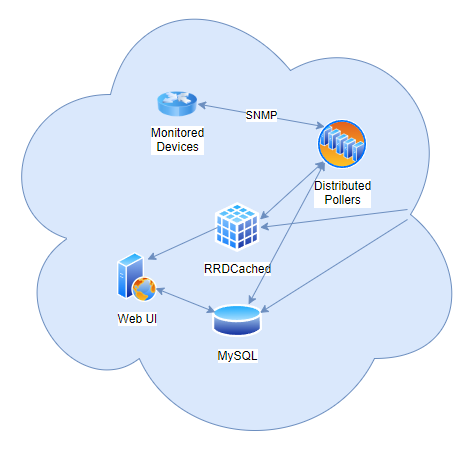
Distributed polling allows the distribution of polling and discovery functions to across multiple servers and virtual machines. This allows for scaling of polling platforms beyond a single system. See Partitioned Polling for a similar system allowing polling around topology and within separated networks.
Each distributed poller requires access to the MySQL database and RRD files on the main Observium system. Access to RRDs can be achieved either by using remote filesystem mounting or by using remote RRDcached. MySQL access is achieved by allowing the distributed poller access to the primary Observium database.
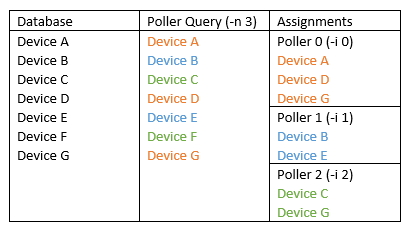
A distributed poller domain is set up by configuring a common "Poller Count" setting on all poller nodes via the poller and discovery option -i and a unique instance number on each poller node via the -n option. Instance numbers start from zero.
Setup Steps
Master RRDCached
This assumes that RRDCached has already been set up on the master system following the RRDCached guide.
Verify this is the case by making sure RRDCached is listening on an external interface
| Text Only | |
|---|---|
You should see at least tcp socket on 0.0.0.0:42217 and sometimes also a tcp6 socket on :::42217
| Text Only | |
|---|---|
Master MySQL
On the master system, configure the MySQL server to listen for connections externally by changing the bind-address entry in the MySQL config
On Ubuntu 18.04 this is in /etc/mysql/mysql.conf.d/mysqld.cnf
You can either comment the entry out to listen on all interfaces
| Text Only | |
|---|---|
Or change the setting to a specific IP address to listen on only that interface
| Text Only | |
|---|---|
Restart the MySQL server
| Text Only | |
|---|---|
Verify that the MySQL server is now listening on either all interfaces or the IP specified
| Text Only | |
|---|---|
Output should show a listening socket on :::3306, 0.0.0.0:3306 or
| Text Only | |
|---|---|
Slave Configuration
The easiest way to set up a poller node is to follow the existing install guide or install script and skip the web section at the end. If you use the install script, you can remove the MySQL server after installation.
Create a MySQL username on master to permit the slave access to the database
Run the following command on the master system to grant the slave access to the MySQL database
You will see the MySQL version upon logging on to the MySQL monitor with mysql -u root -p.
MySQL Credentials
Here you'll set the username and password for the Observium poller to access the database. The username is observium and the password will be the text you insert in place of <SLAVE_MYSQL_PASSWORD>. Make sure you also set the correct IP in place of <SLAVE_IP>.
If your MySQL server is not accessible from external networks, you can allow all slaves to use the same MySQL username and password entry by setting SLAVE_IP to %.
Modify the /opt/observium/config.php to point towards the master system's MySQL and RRDCached ports.
| Text Only | |
|---|---|
If this is configured correctly, you'll be able to test poll a device with ./poller.php -h <hostname> -m system -d. Check if MySQL is working correctly it'll start polling the device, if rrdcached is working correctly it'll successfully write data to any RRDs (look for rrdtool commands in the output).
Disable unused cron jobs
You should remove housekeeping CRON jobs from remote pollers. These are processes that act on the MyuSQL and RRD databases, and can be run from the most central system.
These can be safely removed from any distributed (or partitioned) poller.
Distribution Configuration
If you're setting up Partitioned pollers, you should return to that guide now. The next part is only for Distributed pollers.
We need to modify the cron jobs to tell Observium how many poller nodes there are and which poller node it's running on.
You can add -i <count of poller nodes> -n <number of this poller, starting from zero> to the poller and discovery cron jobs.
| Text Only | |
|---|---|
For example, to configure a node to be the third node in a three node poller, after modification the entries would look like this
| Text Only | |
|---|---|
If you're adding nodes to an existing setup, be sure to modify any already existing pollers and be sure the options are correct! You can verify that things are being polled correctly by monitoring the pollerlog page.